Saturday 27 November 2010

More Horse and a Tabby cat

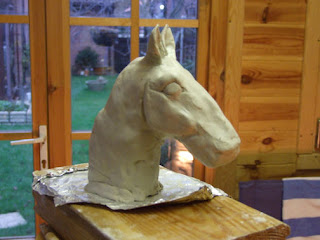
Last night I did some more work on the horse head. Now I wish to issue a disclaimer here as this horse head is an expariment to see what I can do and how it will dry so I recognise the shape is not perfect so please bear with me.

Here I have added a mane and forelock.


You can see from these angles that the shape is not quite right.


This is the worst view. My underlying structure was wrong but I dont mind as it was an experiment and I wont really know how successful it has been until completely dry and I paint it up.


I know how I want to paint him I have a couple of Piebald cobs whose portraits I have painted so I am going to use them as models for colour.

Continuing with my adventures I have also finished off this little cat its based on a drawing I did. I dont know how secure or stable the little tongue is until it dries but then there is always superglue!!


Thursday 25 November 2010

Yipee Day in Studio - Horse Update

I have spent all day in my studio today and had so much fun. My horse head is not wonderful but I am so enjoying doing it here are some more stages. I covered it in baking foil first then modelled some ears out of a bit of car and glued them on with Superglue. 

I know the head is a little broad but I am just bashing this out as my first go. The bronze heads in the background are just to give me a guide.
I sprayed the whole thing with mount spray and then started work. I am using Air Dry FIMO. I rolled pieces out in a polythene bag and began by wrapping layers around the foil base. It looks better from one side than the other.


Here it is tucked up for the night!


Tuesday 23 November 2010

Air Dry Clay - A Horses Head - Probably

You woukl not believe that an adult could have as much fun with Cardboard,Scissors,Glue and Sticky tape as I have this afternoon. I am using a different brand of Air Dry Clay and either my attitude has changed or its better. I have made another version of Kat based loosely on a drawing called Kartoon Kate I did ages ago.

Buoyed by my liking of this new clay I hsve started a horses head. Well when I say horses head that will be the aim.

Yet again I find myself steering clear of overplanning and just got stuck in.

So here is Phase 1 and 2 of my horse

Phase 1

Phase 2

Saturday 13 November 2010

Housebuilding!!

I decided the time had come for some major refurbishment in the Hedgehog Household. The last home had just been used as a bit of a flop house so Heath Robinson here we come!!


The basis of Hedgehog Mansion is :


A Milk Crate.


I attempted initially to cut out the milk slots to make more room but after about and hour got fed up.


So I packed the inside with broken up polystyrene made some holes with an old soldering iron and then wired a piece of old wood inside to make a 'roof cavity'. A bit like poor mans loft insulation but it should also become somewhere that insects can hide in.


Here is Hedgehog mansion positioned behind the bamboo.


I blocked the holes on 3 sides with old edging stones and bricks. I put some large old lumps of wood on top and dumped loads of rotting wood around. Now over the winter I will gradually add to the heap as I find 'stuff'.


Thus hedgehog mansion becomes a combined compost area, food cupboard and hotel room.


I have piled up loads of loose grasses and leaves beside it as in the past I have found if you leave ample bedding around rather than stuffing it all inside Mrs Hedgehog drags it in and that way its easy to tell if you have any tenants.

And this is how much of Hedgehog Mansion is viewable from the rest of the Garden.